

In today’s digital age, having a professional email ID is not just an option but a necessity for any business professional. Whether you’re a freelancer, a small business founder, or managing an established company, your communication reflects directly on your business’s identity and professionalism. Opting for a personalized work email, especially one linked to your business domain, sets a tone of professionalism and builds trust with your clients and stakeholders.
In this article, we will explore how to quickly set up a professional email ID using three popular platforms: Neo Mail, Zoho Mail and Google Workspace (formerly G Suite). Each service offers unique features and benefits, making them suitable for different business needs and sizes. Let’s dive into the specifics of each platform and guide you through creating your professional email ID in less than two minutes.
What is a Work Email ID (Business Email Address)
A business email address is a professional contact point that reflects your company’s domain and brand, unlike personal email addresses, which can be created with generic email service providers like Gmail, Yahoo, or others. For instance, instead of using something like johndoe@gmail.com, a business email would look more like john.doe@yourcompany.com. This structured format enhances the professional appearance and promotes your brand every time you send an email.
Why You Need a Professional (Business) Email Address
- Professionalism: Having a domain-specific email address reinforces your professionalism. It shows you are serious about your business and helps make a good first impression. For instance, when you reach out to potential clients or partners, a professional email address can help establish trust and credibility more effectively than a generic or personal one.
- Branding: Every email you send is an opportunity to market your brand. A business email address that includes your company name reinforces your brand identity. This consistent exposure can increase brand awareness and recall among your recipients.
- Security and Control: Business email addresses have enhanced security features crucial for protecting sensitive information typical in business communications. Providers often offer tools to control spam, malware, and other security risks. Furthermore, using a business email platform, you can have greater control over your company’s communications and manage email accounts as employees join or leave the organization.
- Integration with Business Tools: Business email addresses typically integrate seamlessly with other business tools and systems, such as Customer Relationship Management (CRM) systems, accounting software, and project management tools. This integration enhances productivity and collaboration within a company.
- Customer Confidence: Customers often perceive companies with domain-specific email addresses as more stable and established. A business email address can thus help build consumer trust, essential for customer acquisition and retention.
- Legal Compliance: In some cases, using a business email address is part of regulatory compliance, particularly where official communication records need to be maintained, such as in finance or healthcare sectors. Business email services often provide necessary features like archiving capabilities that assist compliance.
What Do You Need to Create a Business Email Address?
Creating a business email address involves a few essential steps and components to ensure it aligns with your professional needs and enhances your business communications. Here’s what you need to get started:
1. Domain Name
The first step in creating a business email address is to get a domain name. This will form part of the email address after the '@' symbol, like @yourcompany.com. If you don’t already own a domain, you must register one through a domain registrar. Choose a domain name that reflects your business name or industry to maintain consistency and brand recognition.
2. Email Hosting Service
Once you have a domain, the next step is to choose an email hosting service. This service will host your email accounts and handle the sending and receiving your emails. There are several options available, including:
- Dedicated Email Hosting Providers like Zoho Mail or Microsoft Exchange.
- Web Hosting Services that include email as part of their hosting package, like Bluehost or GoDaddy.
- Comprehensive Business Suites, such as Google Workspace or Microsoft 365, offer email services and other business tools like word processors, spreadsheets, and more.
3. Configuration of DNS Records
After selecting your email hosting service, you must configure the Domain Name System (DNS) records for your domain. This typically involves setting up MX (Mail Exchange) records to point to your email hosting server. This configuration ensures that emails from your business email address reach your server.
4. Creating Email Accounts
With the DNS settings configured, the next step is to create individual email accounts. This could be addressed for different departments (e.g., sales@yourcompany.com, support@yourcompany.com) or individual employees (e.g., john.doe@yourcompany.com). Most email hosting services provide a control panel to manage these accounts easily.
5. Security Measures
Implement security measures to protect your email communications. This includes setting up spam filters, using secure passwords, and enabling two-factor authentication (2FA). It’s important to educate your team on best practices for email security to prevent phishing attacks and other security threats.
6. Integration with Other Tools
If you’re using a business suite like Google Workspace or Microsoft 365, you can integrate your email with other tools provided in the suite for better workflow and productivity. For example, you can integrate your email with calendar apps, document management systems, and more.
7. Email Client Setup
Finally, decide whether you will access your emails via a web browser or through an email client like Microsoft Outlook or Apple Mail. Setting up an email client involves configuring IMAP or POP3 server settings provided by your email hosting service.
By following these steps, you can establish a professional and secure business email setup that enhances your brand's image and improves communication efficiency within your company.
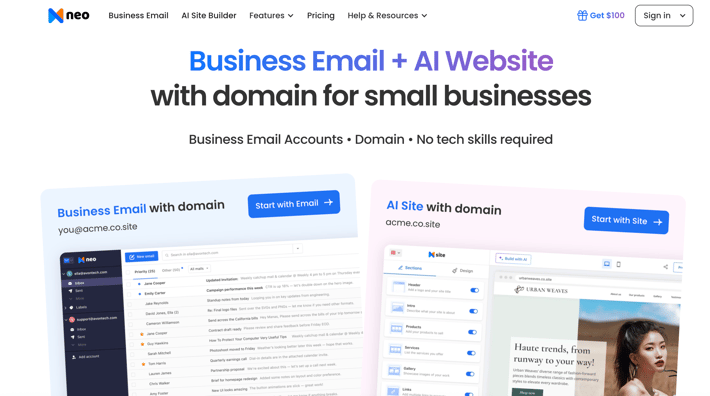
Option 1: Create a Work Email ID (Business Email With Domain)
[Only Free Trial]
1.1 Creating Work Email ID (Business Email) With Domain?* - Neo Mail
Here are the straightforward steps:
Step 1: Choose a Business Plan
Begin by selecting a suitable business plan from Neo Mail.
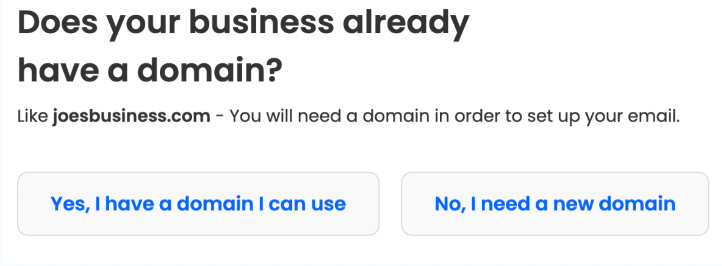
Step 2: Domain Selection
Choose 'No, I need a new domain'
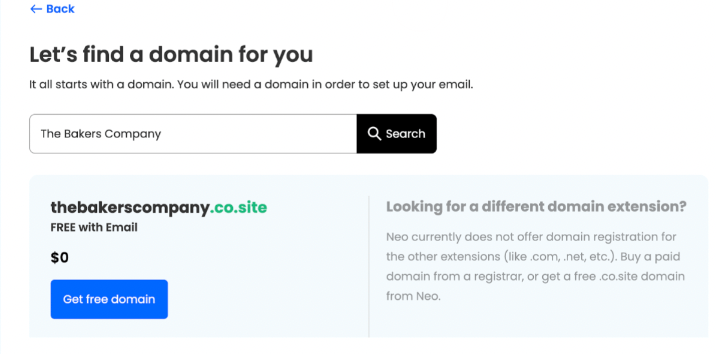
Step 3: Domain Customization
Choose a domain name based on your brand name.
Step 4: Account Setup
Fill in the required details to set up your customer account.
Step 5: Mailbox Information
Enter all necessary details for your first mailbox setup.
Step 6: Activation
Click Continue to finalize the setup.
Step 7: Completion
You've successfully established a business email account with Neo Mail without needing a domain.
Benefits of Neo Mail
- Easy Setup: Create email account in 2 minutes
- Read Receipts: Know when your emails are opened.
- Unlimited Email Templates: Save time with ready-to-use templates.
- Follow-up Reminders: Never miss a follow-up.
- Sender Blocking: Manage your inbox by blocking unwanted emails.
Explore these features with our free trial to see what Neo Mail can offer you.
Option 2: Create a Work Email ID (Business Email) With an Existing Custom Domain
[Only Free Trial]
2.1 Creating Work Email ID with Zoho Mail (Connect your Existing Domain)
Getting Started with Zoho Mail
Zoho Mail is a secure email hosting service tailored for businesses, emphasizing privacy and featuring an ad-free online experience. Here’s how to set up your account quickly:
Step 1: Sign Up for Zoho Mail
Visit the Zoho Mail website and choose the "Mail" service. You can sign up for a free version if you're a small team or select from various premium plans that offer more features.

Step 2: Domain Setup
If you already own a domain, Zoho allows you to integrate your domain with your email. If not, you can purchase a domain directly through Zoho’s domain registration service.
Step 3: Verify Domain Ownership
Zoho will ask you to verify your domain ownership by adding a TXT record to your DNS settings. This step is crucial for the security and uniqueness of your domain.

Step 4: Create Your Email Account
Once your domain is verified, you can set up your email accounts. Zoho’s control panel allows you to manage users and email accounts efficiently.
Step 5: Start Using Your Professional Email
With your account set up, you can start sending and receiving emails using your new professional email address.
Benefits of Zoho Mail
Zoho Mail is particularly appealing to those who prioritize privacy and cost-effectiveness. It offers extensive control over data and seamless integration with other Zoho products, enhancing productivity and collaboration within your team.
2.2 Creating Work Email ID (Business Email) with Domain (Existing)
Getting Started with Google Workspace
Google Workspace, formerly known as G Suite, provides a set of intelligent apps, including Gmail, Docs, Drive, Calendar, and more, and is designed to be your all-in-one suite for business productivity.
Step 1: Sign Up for Google Workspace
Head to the Google Workspace website and choose a plan that fits your business size and needs. Google offers a range of plans, each providing various storage options and business tools.

Step 2: Connect Your Domain
Similar to Zoho, if you have an existing domain, you can connect it during setup. Alternatively, you can buy a new domain directly through Google.

Step 3: Verify Your Domain
Google will also require you to verify your domain ownership by adding a record to your DNS settings. This step is vital for using your domain with Google services.

Step 4: Configure DNS Settings
Configure your DNS settings to direct your email to Google’s servers. This step is crucial for ensuring your emails are sent and received through Google’s infrastructure.
Step 5: Create Your Email Accounts
Once your domain is configured, you can create individual email accounts for your team members within the Google Workspace admin console.
Step 6: Start Using Google Workspace
With your accounts created, your team can now enjoy the full range of Google Workspace tools, from email to collaborative document editing.
Benefits of Google Workspace
Google Workspace's seamless integration with various productivity tools and services stands out. It is especially beneficial for teams that rely heavily on collaboration and Google’s ecosystem of apps.
Tips for Efficient Email Management
Regardless of your chosen platform, managing your email efficiently is key to maintaining productivity. Here are some practical tips that can help you and your team manage emails more effectively:
- Prioritize Your Inbox: Use the "star" or "flag" feature to mark important emails that require immediate attention. This helps prioritize tasks and ensures that critical emails are not overlooked.
- Organize with Folders and Labels: Create folders or labels for different categories of emails, such as clients, projects, internal, personal, and urgent. This organization makes it easier to find specific emails when needed and keeps your inbox less cluttered.
- Use Filters and Rules: Most email services allow you to set up filters or rules that automatically sort incoming emails into appropriate folders or labels based on predefined criteria, such as the sender, subject line, or keywords. This automation can save you time and effort in managing your emails.
- Unsubscribe from Unnecessary Newsletters: Regularly review your subscription list and unsubscribe from newsletters or updates no longer relevant to you. This will reduce the volume of non-essential emails and keep your inbox focused on important communications.
- Set Specific Times for Checking Emails: Rather than constantly checking your inbox throughout the day, set specific times to handle your emails. This can help in reducing distractions and improving focus on other important tasks.
- Use Templates for Common Responses: If you send similar responses to different emails, create templates you can quickly customize as needed. This approach can significantly speed up your response time.
- Implement the Two-Minute Rule: Respond immediately to emails requiring a response that can be handled in less than two minutes. This method helps in reducing the backlog of emails that need attention.
- Utilize Search Functions: Become familiar with the search functions of your email system. Learning to search your email effectively can drastically reduce the time spent looking for specific messages or attachments.
- Archive Old Emails: Instead of keeping old emails in your main inbox, archive them. This keeps your primary inbox clear but allows you to access older emails if necessary.
- Take Advantage of Email Management Tools: Consider using third-party tools or plugins that enhance email management capabilities, such as sorting, tracking, and scheduling emails. Tools like SaneBox, Boomerang, or Mailstrom can offer additional features that help manage your emails more efficiently.
- Educate Your Team: If you are managing a team, educate them about best practices in email management. Sharing tips and tools can help everyone maintain their inboxes effectively and ensure consistent organizational communication practices.
Implementing these tips can lead to a more organized and less stressful email experience, helping you and your team stay productive and focused.
Conclusion
Setting up a business email ID with Zoho Mail or Google Workspace can enhance communication strategies, streamline operations, and project a professional image. A professional email address facilitates communication establishes your brand, secures your data, and integrates with the tools powering your business. Whether you're a solo entrepreneur or part of a larger enterprise, follow the steps in this blog to create a professional email ID that meets your communication needs while enhancing productivity and security. Every email reflects your business, so ensure it's professional and effective. Establishing a professional email address is the foundation for your business's growth and success. Apply these insights to transform your communications into a streamlined, secure, professional operation. Let your email address be the gateway to opportunities and the first step in forging lasting business relationships.